Let's try one of the best low power bluetooth and nfc SoCs on the market.
The ordering
First we need a development board and a programmer.
So we search some sources for nRF52832 development boards:
(all pricerates today 2016.09.23)
digikey: ~39$ (not including tax and shipping, programmer included)
mouser: ~39$ (not including tax and shipping, programmer included)
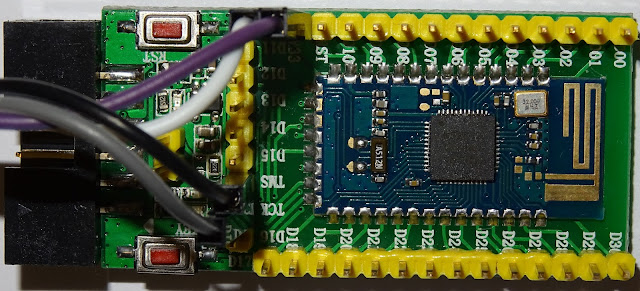
aliexpress: ~20$ (including shipping, for me no tax and custom dues, no sensors, no programmer)
Now we search for a programmer:
digikey: ~90$ (not including tax and shipping)
mouser: ~90$ (not including tax and shipping)
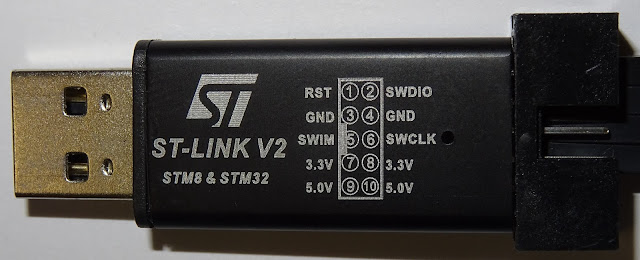
aliexpress: ~2$ (including shipping)
Sorry my development budget is small. So give aliexpress a try. 3 weeks later (cheap shipping included) we have a development suite ready.
 |
| aliexpress nRF52832 board |
 |
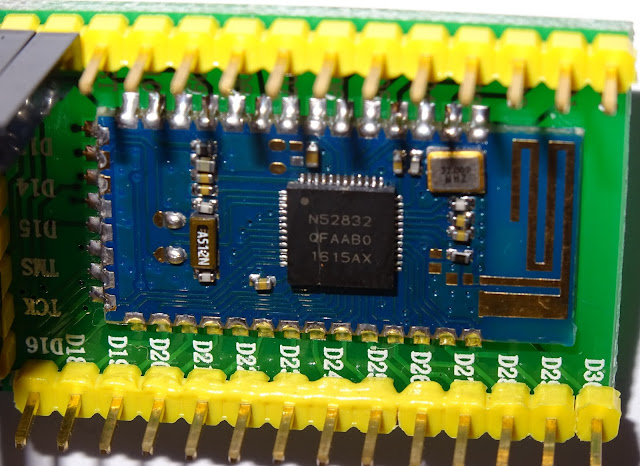
| nRF52832-QFAA SoC ARM Cortex M4 |
 |
| ST-Link V2 Programmer (genuine? work!) |
The Hardware
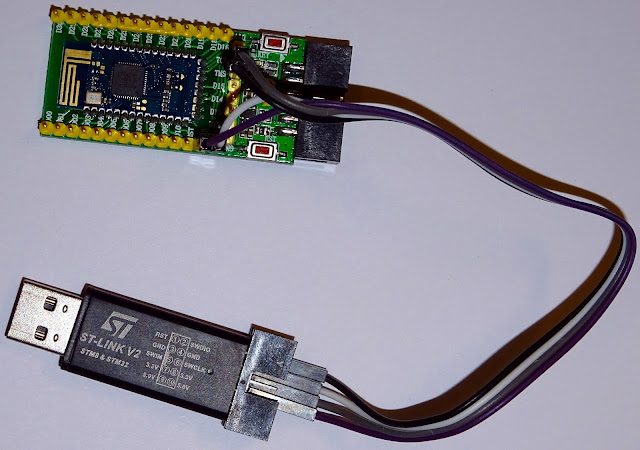
The seller give no instruction for the board so we have to use some inspection and a continuity tester to follow the traces with help from nordics nRF52832-QFAA reference layout. So we find the Pins for SWDIO and SWCLK -> SWCLK goes to TCK and SWDIO goes to TMS and we use 3.3V and GND.
 |
| ST-Link V2 and nRF52832 wired up |
The Software
- ST-Link V2
I use ubuntu 16.04 so the ST-Link V2 don't PnP out of the box, we need some more packages:
sudo apt-get install git
sudo apt-get install autoconf
sudo apt-get install libusb-1.0-0-dev
Then we build the drivers for the ST-Link V2 from source:
git clone https://github.com/texane/stlink stlink.git
cd stlink.git/
./autogen.sh
./configure
make
Then we copy the driver and udev rules:
sudo cp st-* /usr/bin
find . -name "*.rules"
sudo cp ./etc/udev/rules.d/49-stlinkv2.rules /etc/udev/rules.d
And activate the udev rules:
sudo udevadm control --reload-rules
sudo udevadm trigger
Let's check:
lsusb
Bus 001 Device 021: ID 0483:3748 STMicroelectronics ST-LINK/V2
dmesg
[0] usb 1-7: new full-speed USB device number 21 using xhci_hcd
[0] usb 1-7: New USB device found, idVendor=0483, idProduct=3748
[0] usb 1-7: New USB device strings: Mfr=1, Product=2, SerialNumber=3
[0] usb 1-7: Product: STM32 STLink
[0] usb 1-7: Manufacturer: STMicroelectronics
[0] usb 1-7: SerialNumber: 6
- openocd
Now we need openocd to use the programmer to flash our nRF52832 firmware:
git clone git://git.code.sf.net/p/openocd/code openocd-code
And we need some patches for the nRF52832 (more info on devzone.nordicsemi.com and openocd.zylin.com):
Then i added to openocd-code/src/flash/nor/nrf52.c in line 133 to fit my nRF52832 hardware:
{
.hwid = 0x00C7,
.variant = "QFN48",
.build_code = "B00",
.flash_size_kb = 512,
},
Let's build and install openocd:
cd openocd-code/
./bootstrap
./configure
make
sudo make install
An openocd config-file (i.e. openocd_nrf52.cfg) can look like this:
#nRF52832 Target
source [find interface/stlink-v2.cfg]
transport select hla_swd
source [find target/nrf52.cfg]
And test our board:
openocd -d2 -f openocd_nrf52.cfg
Open On-Chip Debugger 0.10.0-dev-00322-g406f4d1-dirty (2016-09-23-11:47)
Licensed under GNU GPL v2
For bug reports, read
http://openocd.org/doc/doxygen/bugs.html
debug_level: 2
Info : The selected transport took over low-level target control. The results might differ compared to plain JTAG/SWD
adapter speed: 10000 kHz
Info : Unable to match requested speed 10000 kHz, using 4000 kHz
Info : Unable to match requested speed 10000 kHz, using 4000 kHz
Info : clock speed 4000 kHz
Info : STLINK v2 JTAG v17 API v2 SWIM v4 VID 0x0483 PID 0x3748
Info : using stlink api v2
Info : Target voltage: 3.273018
Info : nrf52.cpu: hardware has 6 breakpoints, 4 watchpoints
Connect with telnet and cleanup our chip (get rid of all test stuff):
telnet localhost 4444
Trying 127.0.0.1...
Connected to localhost.
Escape character is '^]'.
Open On-Chip Debugger
> reset halt
nrf52.cpu: target state: halted
target halted due to debug-request, current mode: Thread
xPSR: 0x01000000 pc: 0x00000b58 msp: 0x20010000
> nrf52 mass_erase
> reset
> exit
Connection closed by foreign host.
- GNU ARM Compiler
Next step get the GNU ARM Compiler to build our firmware:
Download ready packages from launchpad.net.
I use this linux version gcc-arm-none-eabi-5_3-2016q1-20160330-linux.tar.bz2
Unpack with
tar xvjf gcc-arm-none-eabi-5_3-2016q1-20160330-linux.tar.bz2
- Nordic SDK 12.0.0
Download the package from developer.nordicsemi.com:
actual release nRF5_SDK_12.0.0_12f24da.zip
and unpack:
unzip nRF5_SDK_12.0.0_12f24da.zip
The Firmware
Let's start with blinky (all sourcecode available in github.com/pcbreflux) :
On our nRF52832 development board there are two useable LEDs. After some tracing we discover they are on GPIO pin 30 and GPIO pin 31.
So our C - program can look like this:
#include <stdlib.h>
#include "nrf_delay.h"
#include "nrf_gpio.h"
const uint32_t led_pin1 = 31;
/**
* @brief Function for application main entry.
*/
int main(void) {
// setup
// Configure LED-pin as outputs and clear.
nrf_gpio_cfg_output(led_pin1);
nrf_gpio_pin_clear(led_pin1);
// loop
// Toggle LED.
while (true) {
nrf_gpio_pin_toggle(led_pin1);
nrf_delay_ms(1000); // 0.5 Hz
}
}
Now we need one Makefile:
TEMPLATEROOT = ..
# compilation flags for gdb
CFLAGS += -O0 -g
CFLAGS += -DBOARD_CUSTOM
CFLAGS += -DNRF52832
ASFLAGS += -g
ASMFLAGS += -DBOARD_CUSTOM
ASMFLAGS += -DNRF52832
LDSCRIPT = $(TEMPLATEROOT)/blank_nrf52832_QFAA.ld
# object files
OBJS = system_nrf52.o main.o
# include common make file
include $(TEMPLATEROOT)/Makefile.common
For Makefile.common see github.com/pcbreflux.
And our linker-file (blank_nrf52832_QFAA.ld):
SEARCH_DIR(.)
GROUP(-lgcc -lc -lnosys)
MEMORY
{
FLASH (rx) : ORIGIN = 0x0, LENGTH = 0x80000
RAM (rwx) : ORIGIN = 0x20000000, LENGTH = 0x10000
}
SECTIONS
{
.fs_data :
{
PROVIDE(__start_fs_data = .);
KEEP(*(.fs_data))
PROVIDE(__stop_fs_data = .);
} > RAM
} INSERT AFTER .data;
INCLUDE "nrf5x_common.ld"
Build the firmware blinky.hex:
make
...
'/home/pcbreflux/nordic/gcc-arm-none-eabi-5_3-2016q1/bin/arm-none-eabi-gcc' -Xlinker -Map=_build/blinky.map -mthumb -mabi=aapcs -L/home/pcbreflux/nordic/nRF5_SDK_12.0.0/components/toolchain/gcc -T../blank_nrf52832_QFAA.ld -mcpu=cortex-m4 -Wl,--gc-sections --specs=nano.specs -lc -lnosys -o _build/blinky.out _build/system_nrf52.o _build/main.o _build/gcc_startup_nrf52.o
'/home/pcbreflux/nordic/gcc-arm-none-eabi-5_3-2016q1/bin/arm-none-eabi-objcopy' -O binary _build/blinky.out _build/blinky.bin
'/home/pcbreflux/nordic/gcc-arm-none-eabi-5_3-2016q1/bin/arm-none-eabi-objcopy' -O ihex _build/blinky.out _build/blinky.hex
and flash blinky.hex to our nRF52832 development board:
make flash
...
** Programming Started **
auto erase enabled
Info : nRF51822-QFN48(build code: B00) 512kB Flash
Warn : using fast async flash loader. This is currently supported
Warn : only with ST-Link and CMSIS-DAP. If you have issues, add
Warn : "set WORKAREASIZE 0" before sourcing nrf52.cfg to disable it
nrf52.cpu: target state: halted
target halted due to breakpoint, current mode: Thread
xPSR: 0x61000000 pc: 0x2000001e msp: 0x20010000
wrote 4096 bytes from file _build/blinky.hex in 0.207181s (19.307 KiB/s)
** Programming Finished **
** Verify Started **
nrf52.cpu: target state: halted
target halted due to breakpoint, current mode: Thread
xPSR: 0x61000000 pc: 0x2000002e msp: 0x20010000
verified 3120 bytes in 0.041079s (74.171 KiB/s)
** Verified OK **
The nRF51822-QFN48 is just a mislead in our openocd patch (see nrf52.c at line 404).
Summary
Practical demonstration can be found on youtube https://youtu.be/dB4xIs0-Kb4.
This comment has been removed by the author.
ReplyDeleteHello
ReplyDeleteI am very interested in this tutorial on nRF52832
I am blocked when installing the ST-LINK V2
The "yves@yves-Satellite-L40:~/stlink.git/stlink.git$ ./autogen.sh" line returns
"-bash: ./autogen.sh: No such file or directory"
My "autogen.sh" file is located in "lib/firmware/carl9170fw"
Can you help me (I use UBUNTU 32b Linux version 4.8.0-36-generic (buildd @ lgw01-13) (gcc version 5.4.0 20160609 (Ubuntu 5.4.0-6ubuntu1 ~ 16.04.4)) # 36 ~ 16.04.1-Ubuntu SMP Sun Feb 5 09:39:41 UTC 2017)
Thank you for your help
Yves Accard
Hi,
ReplyDeleteDo you know how to check BlueTooth connectivity?
Thank you for sharing this information. This article is very interesting and useful. Keep up the good work!
ReplyDeleteMelbourne App Developer
Hi,
ReplyDeleteI want to try out above tutorial in windows. Can anyone help me out how to do?
Great instruction. A money saver solution!
ReplyDeleteBut I have some comments:
In the meantime openocd-git works without patches (tested 2018-02-14 on arch linux, aur-package 'openocd-git').
Connecting with telnet the command 'help' tells the change of the erasing command. Now: 'nrf5 mass_erase'
Using the arch linux package arm-none-eabi-gcc I modified the file './components/toolchain/gcc/Makefile.posix' from the latest nordic sdk (nRF5_SDK_14.2.0):
GNU_INSTALL_ROOT := /usr/bin/
GNU_VERSION := 7.3.0
GNU_PREFIX := arm-none-eabi
After downloading your example from github.com/pcbreflux I also modified the file './nordic/nRF52832/Makefile.common':
GNU_INSTALL_ROOT=/usr
SDK_PATH='where ever'
OPENOCDPATH=/usr
I also appended the line:
INC_PATHS += -I$(SDK_PATH)/config
Thanks for the instruction.
I want flash nrf52811 from st link ve through keil on windows...please suggest how to flash?
ReplyDelete